
Make Your Own Electric Guitar
The idea of this article on making your own electric guitar is to give you a real, practical idea of the magnitude of the job and the skills, tools and raw materials needed to make your own electric guitar. The original electric guitar was a railway sleeper with strings. The designer, Les Paul, finally marketed his invention with a guitar shape because he felt that was what people expected of an electric guitar, not because any particular shape was really necessary to make music.
So if you fancy yourself as a designer, you could try making an electric guitar to your own specifications but you will need certain materials to work with. The first thing you will need is a love of working with wood. The second is an arsenal of power tools like drills, routers, saws, and fiddly bits of hardware. Your environment is also crucial. You will need a workspace which is not too hot or cold or wet or dry!
When you design your home made electric guitar, you will need to know how long your neck is going to be and how far apart your frets will be. You will also have a choice of the basic shape of the head of your guitar – the part that holds the tuning pegs.
You probably already know that a pickup near the neck gives a deeper sound than a pickup close to the bridge. The placement and configuration of the pickups on an electric guitar is a science in itself.
Solid body electric guitars are usually made from maple, ash, mahogany, alder, basswood or nut because they possess proven sound qualities for guitar manufacturing. You will need to buy your wood from a sawmill in lengths rather larger than needed for guitar making, and you will need to cut the wood down to size before making your guitar. You will also need hardware like machine heads, pick guards, fret wire, bridge and whammy bar mechanism. You will also need hardware if you use a bolt-on neck.
For the electronic parts of your electric guitar, you will need pickups – single coil or humbucker, shielding to cut down hum and associated knobs, nuts and grommets.
The first job in making your own electric guitar is making a template of your instrument from plywood. The template is your exact pattern for your finished guitar, and needs to be crafted with care. If you find yourself cutting corners at this stage you may as well stop this project and continue with the home brewing you started two winters ago.
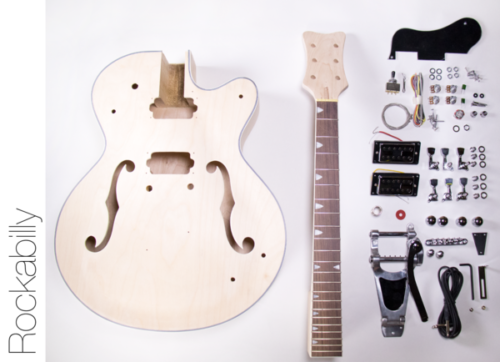
To finish off this short essay, I should mention that there exists another solution for people wanting to make their own electric guitar – the electric guitar kit.
How to Choose and Buy an Acoustic Guitar
Knowing how to choose the right guitar and how to identify a bad one will save you from countless headaches, not to mention finger aches. Also, choosing the right acoustic can be tough, especially these days, when there are so many styles to choose from.
Acoustic guitar bodies come in basically the same shape, with some variations, but they do vary in size, colour, wood-type, style, and extra features. You can even buy an acoustic guitar so small that fits into a hiking backpack.
The most common type of guitar in use today is the folk-style of guitar. This is the guitar you will see played around most campfires and parties, and is the one found in most music groups, church choirs, and in the corner of most homes.
Guitars come in a very wide range of prices, but when it comes to instruments, in general, you get what you pay for, especially when you buy new. There’s a difference between getting a bargain and buying cheap.
But whether you buy new, used, or decide to build your own may be determined by many personal factors, and each has its own pros and cons.
Buying new, gives you a warranty and, hopefully, a return period, if for some reason you’re not totally satisfied with your purchase, or something goes wrong.
Under ‘normal’ circumstances, a used guitar can usually be purchased cheaper and has already gone through its “break-in” period.
Commercially built guitars are usually mass manufactured. “Custom-made” guitars are exactly that. They are custom built and tailored to your specifications by a highly skilled guitar maker.
Prices for a custom-built guitar vary considerably, depending on the skill level of the craftsperson you contract the job to, but, as a rule, they are generally quite higher than a commercially built guitar of “similar” quality. Each custom-built guitar is unique and therefore hard to compare in price to a commercially built guitar.
There is another viable, cost effective, & fun alternative and that is to build your own guitar, like The Fret Wire, for those more industrial types out there. It must be really satisfying to be playing for an audience and announcing that you built the very guitar you are playing.
Understanding some of the parts of a guitar will definitely help you when it comes to the Pre-Purchase Checklist.
BODY: This is the part with the soundhole in the front. It is where the strumming is done, and it can vary in size. The actual size, shape, type of wood, coating, and general build of the body also affects how the guitar will “sound”, whether it’s a rich and warm sound or a thin and ‘twangy’ sound. The body tends to be the part that also gets scratched, damaged, and generally banged-up the most.
NECK: This is the long piece extending from the body and ends at the ‘head’ of the guitar where the ‘Tuning Heads’ are, also known as ‘machine heads’. The strings travel from the ‘Bridge’ on the body, across the sound hole, along the ‘Fret Board’, which is attached to the front-side of the neck, and finally arriving at the tuning heads where they are wrapped around tuning posts. The tuning heads are then turned by hand, which then turns the posts, making the strings tighter or looser, thus affecting their ‘tuning’. Necks tend to warp and twist if not looked after, or if the guitar is left propped against a heat source.
BRIDGE: The Bridge is normally located on the front of the body, by the sound hole, and on the side of the hole opposite to the neck. The strings are usually fed through the bridge first before they cross the hole and travel up the neck to the tuning heads. The bridge is like an anchor-point for the strings. Metal bridges are best, but on most acoustics they are either hard plastic or wood. Bridges have a tendency to crack and split over a long period of time.
FRET BOARD: The fret board is glued to the front of the neck. This is the part you press the strings onto to make chords or play individual notes. Because it’s glued on separately, a fret board can be made of a wood that’s different from the neck.
The strings travel over the fret board and the distance they are above the fret board makes a difference to the playability of the guitar. If the strings are too far above the fret board, then they will be hard to press down, making the guitar hard to play.
When a beginner plays a guitar, initially his or her fingertips are very soft and need to be hardened. A guitar with the strings too far above the fret board, also known as having a ‘high action’, will cause the player’s fingers to hurt so much that they are likely to put the guitar away in discouragement and possibly stop playing altogether.
STRINGS: Acoustic guitar strings, come in a wide variety of ‘flavors’. They can be made out of nylon, brass, steel, or a combination. Nylon strings are usually only found on Classical guitars and Student guitars because they’re easier on the fingertips. They have a rich, warm sound to them.
Strings sets come in different ‘weights’, or sizes. Strings that come from a package marked ‘Heavy’ are usually quite thick in size and sound “beefy”. Strings that are light, or extra light, are very thin and usually have a brighter sound to them, but are also quieter sounding than heavy strings.
String choices are purely personal taste. Light strings are easier to press than heavy strings but also sound quite different. The more often strings are played, the dirtier they get. If a cloth isn’t run over and under them, from time to time, the sound becomes very dull.
No matter where you buy your guitar or build your own if you know what to look for, and spend a little extra effort in your search for that ‘perfect’ guitar, not only will your fingers thank you, but also your ears, and all those who will come to join you around the campfire, or even go to see you in concert. Who knows?
How Gibson Guitars Are Made
The Gibson Guitars Hummingbird model is one of their most loved guitars. Players of Gibson guitars often wonder how the great Gibson Guitars Hummingbird model is made. Made in Nashville, Tennessee, the Gibson Guitars Hummingbird model is made much like their other models. To begin with, the wood is chosen for the Gibson Guitars Hummingbird model. The top of the Gibson Guitars Hummingbird model is glued up into 2″ thick block, and most of the backs are solid. Machines put the front and backs together for the Gibson Guitars Hummingbird model. Most are surprised by the machine assembly of the guitars, however the Gibson Guitar Hummingbird and all other models have been built by machines for over 100 years.
The Gibson Guitars Hummingbird model’s neck is made of up to three different pieces. The pieces of the Gibson Guitars Hummingbird are laminated and cut. The wing blocks are added to the Gibson Guitars Hummingbird and the fingerboards are assembled. Most of the fingerboards on the Gibson Guitars Hummingbird are made of rosewood or ebony. The Gibson Guitar Hummingbird, like all other Gibson guitars, is hand-fretted. When everything is put together, the Gibson Guitar Hummingbird is ready to go.
Many musicians have loved the Gibson Guitars Hummingbird over the years. The Gibson Guitars Hummingbird is one that offers the signature Gibson sound and quality. Durability is one thing that draws artists to the Gibson Guitars Hummingbird. The Gibson Guitars Hummingbird model is a lovely instrument that is also a piece of art.
Guitar Lesson – How To Change Guitar Strings
At some point, all guitarists need to learn how to change the strings on their guitar. Sometimes you’ll be forced to change one when a string snaps. But usually, you’ll simply want to change them, as strings lose their brightness and wear out.
The amount of time you leave between change strings varies depending on several factors. If you play your guitar regularly, then you might like to change your strings once a week or once a month.
Most Professional guitarists tend to change their strings before each gig. But in the end, it all comes down to a matter of personal preference. Something to bear in mind if you’re using your guitar for a gig, is that your strings need a few hours of play to break in properly. During this time, your strings will go out of tune as they stretch so you’ll have to retune.
Anyway, here’s what you do:
Remove the old strings by detuning the machine heads until the tension becomes loose enough to allow you to pull each string away from the headstock.
Another quick way to remove the old strings is to snip them using a pair of wire cutters. Be very careful if you do it this way, and make sure they are loose, since the bare ends of the strings can be sharp and easily flap around. Bare guitar strings are amongst the many things you DO NOT want to catch in your eye.
How you go about installing your new strings will usually depend on the type of guitar you have, as many guitars have slightly different methods. However, the strings are usually held in place at one end by fixtures behind or on the bridge, and at the other by turning the machine head on the headstock.
Here’s a small insider tip guitarists have been using for years to get more life from your steel strings once you’ve removed them: Boil them.
Dropping a set of strings into a pan of boiling water for 10 to 15 minutes will remove a lot of the grimy build up and bring a new life back to what would otherwise be lifeless strings.
It won’t last for very long, and you can’t get away with doing it too many times, but it can be an effective temporary measure.
I wouldn’t suggest you rely on this technique too much, strings aren’t too expensive – and using new strings saves you a lot of hassle.
Regardless of what kind of guitar you have, your strings need to be stretched after you’ve put them on. When you first tune your guitar, put your hand under each string around the pickup area, pull the string a few centimeters away from the fretboard, then release it. If the pitch has dropped, retune and repeat the process. Keep doing this until all the strings stay in tune.
On most electric guitars the strings are either secured at the bridge end by an independent tailpiece (like most Gibson guitars), or passed through the body of the instrument from the back into an all-in-one bridge unit (like most fender style guitars).
At one end of every steel string, you will find a tiny disc of metal around which one end of the string is wrapped. This is called the ball end.
Take the opposite end of the string and thread it through the fixture at the bridge.
Pull the string through until the ball end stops you from pulling the string any further.
Most electric and steel-string guitars use a similar system for securing strings at the machine head. The capstan to which the string is attached stands out vertically from the headstock. Strings can be passed through a hole in the side of the capstan.
The end is then passed around and under, trapping it in place when the machine head is tightened. Some capstans have vertical slots instead of holes. To use these, cut the string to length, and insert into the tip of the capstan. Then bend the string to one side and wind it around.
This leaves the string endings neat and tidy.
Here’s what you do next: Slowly turn the machine head for each string, increasing the tension until the string becomes suitably tight.
To save yourself time and energy, you can use a cheap plastic string winder, which simply fits over the machine head allowing you to crank it along more quickly.
